

Adding Lines to a WoolClip Specification
This guide explains how to add lines to a WoolClip specification using either Line Builder or Auto Generate
How to Add Lines to a WoolClip Specification
- Use Line Builder when you want to manually select bales for each classed line
- Use Auto Generate when you want WoolClip to create lines based on bale description, mob and bin code
Before you start
- Only available or unallocated bales can be selected
- Bales already included on a specification will not appear in Line Builder
- Using bin codes allows WoolClip and Users to identify and separate bales with the same description but made for different classing characteristics
Option 1: Use Line Builder
Line Builder is best used when progressively adding lines to the specification or when the user wants to manually choose which bales contribute to each classed line. This method is generally suited to smaller clips.
Step 1: From the specification module, select Add Line
Step 2: Open the line builder and choose a line description. The list shows the individual bale descriptions used for the job in the wool book.
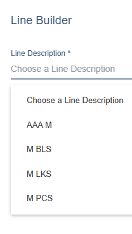
Step 3: Select the bale description to list all the available bales of that description
Step 4: If required, further filter the bales by mob, bin code or bales already on a consignment
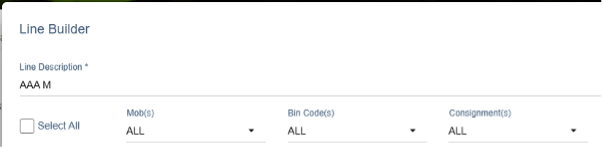
Step 5: Select the mob or mobs to hide or filter out bales
Step 6: Select the bin code to hide bales with other bin codes
Step 7: Choose Select All if all filtered bales are to be added to the line, or select individual bales as required
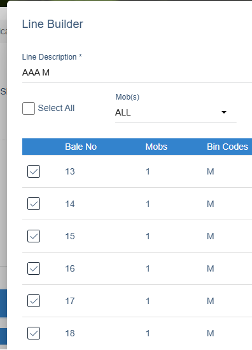
Step 8: Select Save
Step 9: Repeat the process until all required bales and lines have been added
Important notes for Line Builder
- The first bale description selected will appear as the first line on the specification
- The list order can be changed before finalisation, so the user does not need to confirm the final specification order immediately
- Unallocated bales will remain in the wool book and the unallocated bale tally will show in red
- Using a bin code greatly assists the Wool Classer because it allows WoolClip to filter bales and identify bales with the same description but different classing characteristics
Non-matching warning
A non-matching warning is flagged when mobs, mulesing status, bin codes or “runs with” status are being combined in a classed line.
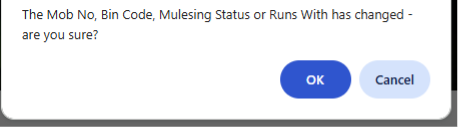
- Select OK only if you want to override the warning and match the selected bales
- Communication and planning are important when matching mobs, especially where the mulesing status declaration may be affected
- For example, when mobs with NM and AA statuses are combined, the declaration will default to AA for the classed line.
Option 2: Use Auto Generate
Auto Generate uses system logic to create lines by matching bales based on bale description, mob and bin code. This option saves time in large clips or where the user has been working out of service and has not been able to progressively add lines.
Step 1: Select Auto Generate Lines
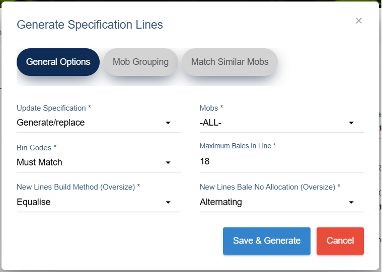
Step 2: Use the available options to create custom specification line rules. Eg Set a maximum number of bales in a line to avoid very large lines being created.
Step 3: If large lines are created, split them using alternating bale numbers or sequential bale numbers
Step 4: Equalise large lines where required. For example, a 31-bale line could be split into two 10-bale lines and one 11-bale line.
Step 5: Review the generated specification and edit lines as needed before finalising
Important notes for Auto Generate
- WoolClip applies the wool-matching rules of mob-based classing
- The system keeps wool from different mobs separate, which may create small or single-bale lines. Use the mob grouping or match similar mobs to customise the mob rules for this clip
- The system matches descriptions and bin codes, but the user should apply classing strategy and wool knowledge to build compatible lines
- After Auto Generate, check whether any lines should be combined, split or edited
Add line comments
- Click the speech bubble to open the text box
- Add the line comment
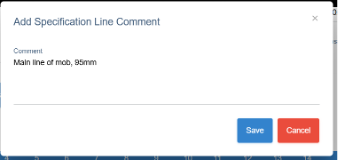
- Select Save
- The speech bubble turns green, which indicates a comment has been added
- Line comments print on the specification. It is recommended that a line comment is added for all classed lines.
Review before finalising
Before finalising, print a draft PDF and review the specification carefully.
Step 1: Check line comments
Step 2: Check bale allocation to lines
Step 3: Check NWD and classed status of lines, including D CERT bales/lots
Step 4: Check whether lines need to be combined or split
Step 5: Check the allocation of mulesing status on each line
Step 6: Edit any details as required before finalising
Note: Print Draft downloads a PDF copy of the specification to the user’s device for review

Finalise and send the specification
Step 1: Select Finalise and Send

Step 2: Review the confirmation details shown in the text box
Step 3: Send the specification to release the data to the marketing organisation admin and the warehouse. Finalise and Send emails the specification to the marketing organisation, the Wool Classer, owner or manager, and marketing representatives in the team.
Unfinalise or update a specification
Once a specification has been finalised it cannot be edited unless it is unfinalised. Conditions apply:
- The finalisation count is limited to once only, or within the 18-hour time limit
- If outside the unfinalisation conditions, contact AWEX WoolClip support to unlock the specification
- When contacting WoolClip support, quote the S number
Troubleshooting
Issue: The specification has not arrived at the marketing organisation.
Action: Check whether the specification was created but not finalised. AWEX sends the user an email notification when a specification has been created and remains in draft. Open the specification from the email and select Finalise and Send.
Next steps
When you are comfortable with this workflow, explore related guides, watch WoolClip how-to videos, or contact AWEX WoolClip support if you need help.
Still need help?
Get in touch with our support team and we'll walk you through it.