

From Wool Book to WoolClip. User Access
Already recorded your bale information in a physical wool book? Use this guide to set up a user in the Team allowing them to enter bale details from the physical wool book and scan the eBIDs. Anyone with WoolClip access can enter wool book information in the app or the Web. Wool classers are encouraged...
Already recorded your bale information in a physical wool book?
Use this guide to set up a user in the Team allowing them to enter bale details from the physical wool book and scan the eBIDs. Anyone with WoolClip access can enter wool book information in the app or the Web.
Wool classers are encouraged to use WoolClip for jobs wherever possible. WoolClip can make entering bale details into a specification much easier, particularly for larger or more complex jobs.
If the information has already been recorded in a physical wool book, it can still be quickly transferred into WoolClip. Ideally, the Wool Classer would enter the information, as they are already familiar with the bale details, but this does not have to be done by the Wool Classer.
Once the information has been recorded in the physical wool book, any authorised person can enter bale details into WoolClip. This could be the wool presser, wool handler, wool marketing rep, farm manager, or another suitable person. The most efficient and timely way to record a bale and the eBID is as close to the time of pressing as possible. To keep the workflow running smoothly this would ideally be completed by the Wool Classer or presser.
If this isn’t possible, the information can be entered into WoolClip later. The important thing is that the physical wool book is complete and accurate, and that the bale information and eBID are transferred to WoolClip before the bale leaves the shed or is loaded for transport.
Before You Begin
- The user needs a WoolClip account, the WoolClip app and access to the relevant job.
- WoolClip team members with Job Administrator, Wool Classer and/or Wool Presser role automatically receive access to the Wool Book module on the web and in the app.
- Wool Pressers can create their own login to use the app on any device.
- Wool Growers receive full Wool Book access when the farm account’s WoolID has been added to the job and approved.
- Other suitable users may include Wool Handlers, Station Workers, Wool Brokers, Farm Managers and authorised Wool Grower family members.
Set up access for whoever is best placed to enter the information from the physical wool book.
1: Set Up User Access
1. Create an account. If the user does not already have an account, go to www.woolclip.com.au select Create Account. Complete the contact details and create a username and password.
2. Install the app. Install the WoolClip app on the device that will be used in the shed.
3. Add the user to the team. Ask a user with the Job Administrator role to add the person to the relevant job team.
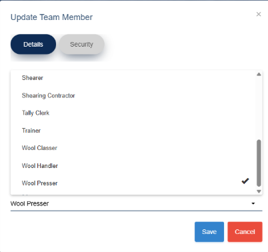
4. Assign access. The Job Administrator must assign at least the Wool Presser role or select full Wool Book access in the user’s security settings.
5. Open the job while online. While the device has internet service, sign in to the app and select the current job.
6. Open the Wool Book. Select the bale icon to open the Wool Book.
7. Switch to shed mode. After the job and Wool Book are available on the device, go offline and use shed mode as required.
2: Keep the Physical Wool Book
Continue to use the physical wool book as you normally do.
Record a physical wool book throughout shearing for every bale. Record the bale description exactly as it appears on the bale, the bin code, bale weight, clear mob information and any mob cut-outs. The Wool Classer and Wool Presser should work together to keep this record accurate.
The physical wool book is then used as the source for entering the information into WoolClip. The person doing this does not need to be the person who originally recorded the information.
3: Enter a Bale and Collect the eBID in the app
Once the Wool Classer’s information has been recorded in the physical wool book, it can be entered into WoolClip at a time that suits the shed workflow.
Ideally, this is done as each bale is pressed, so the bale information and eBID are captured together. However, if this wasn’t done at the time, the information can be entered later.
- Open the current job in the WoolClip app.
- Select the bale icon to open the Wool Book.
- Tap the blue + icon to Create a new bale entry.
- For each bale, scan the eBID
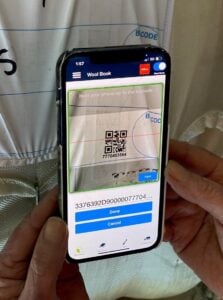
5.Check that the description, bin code, line, weight, mob information and cut-outs match the physical record.
6.Transfer the bale information from the physical wool book into the bale details fields in the app.
7.Save the bale entry.
When to Add Bale Entries
Choose the approach that works best for your shed and the people doing the work.
Select what works best:
- As each bale is pressed
- At the end of a run
- At the end of the day
- At any other time before the bale leaves the shed or is loaded for transport
You do not need to stop the normal shearing workflow to enter information into WoolClip immediately. Where possible, recording the bale and eBID as the bale is pressed is the simplest and most efficient approach. If that isn’t practical, the information can be entered later from the physical wool book.
The important thing is that the information recorded in the physical wool book is accurately transferred to WoolClip and the eBID is collected before the bale leaves the shed or is loaded for transport.
Making the job easy.
The collaborative function of WoolClip allows authorised users to enter bale details and scan eBIDs.
This means the work doesn’t all have to be done by one person. Keep the physical wool book as your record, and the Wool Classer, Wool Presser or another then any authorised person can enter the information into WoolClip when it suits the shed workflow.
For larger or more complex jobs, using WoolClip can also make entering and managing the information needed for the specification much easier.
Still need help?
Get in touch with our support team and we'll walk you through it.